How to Take Screenshot with Mouse Pointer
In my previous post (Print a Screen with Mouse Cursor) I have explained simple way to add mouse pointer in the screenshot. now I am going to explain How to take Screenshot with Mouse Cursor using free tools.
Bellow steps will tell you How to take Screenshot with Mouse pointer.
Step 1:
Download Free Screen Capturer from Extensoft website link and install it.
Step 2:
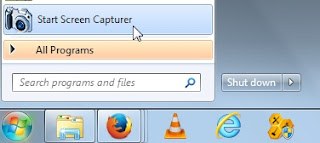
Open Free Screen Capturer by clicking Start Screen Capture from start menu.

Step 3:
Open the Window/Application you you want to capture (take Screenshot) it.
Step 4:
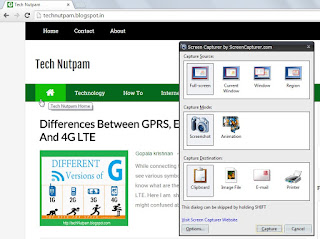
Now Press the "PrtScr" (print screen) button on your keyboard then it will open the Screen Capturer window and it will ask you whether you want to capture the full screen, an application window or a region of your screen.

If you want to record your screen then click animation option under capture mode. and it will captures sequences of screenshots as animated video as WMV (Window Media Video) format.
Step 5:
select your option then press Enter key or click "Capture" button to save your screenshot to the clipboard, a file, or email.
Step 6:
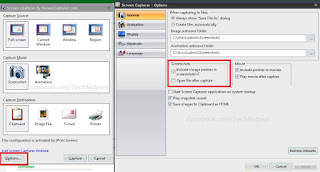
If you want to take the screen shot with mouse pointer (cursor). Click Option button in Screen Capturer
Then select Include mouse pointer in Screenshots option under General tab then click OK button.

Now go to the window you want to capture the screen then click Print screen ("PrtScr") button on your keyboard. Now this will capture the Screen with mouse pointer.
To Get All The Technical Updates in TechNutpam Just Like TechNutpam Page in Facebook
If you like this post about how to Print a Screen with Mouse Cursor then share it with your friends.
Bellow steps will tell you How to take Screenshot with Mouse pointer.
Step 1:
Download Free Screen Capturer from Extensoft website link and install it.
Step 2:
Open Free Screen Capturer by clicking Start Screen Capture from start menu.

Step 3:
Open the Window/Application you you want to capture (take Screenshot) it.
Step 4:
Now Press the "PrtScr" (print screen) button on your keyboard then it will open the Screen Capturer window and it will ask you whether you want to capture the full screen, an application window or a region of your screen.

Step 5:
select your option then press Enter key or click "Capture" button to save your screenshot to the clipboard, a file, or email.
Step 6:
If you want to take the screen shot with mouse pointer (cursor). Click Option button in Screen Capturer
Then select Include mouse pointer in Screenshots option under General tab then click OK button.

To Get All The Technical Updates in TechNutpam Just Like TechNutpam Page in Facebook
If you like this post about how to Print a Screen with Mouse Cursor then share it with your friends.


Comments
Post a Comment